Knowledgebase

Web Authorizer USB Configuration

  • 0

..//assets/img/kb/usbDrive.png Web Authorizer USB Configuration

Configure with a USB Flash Drive

If any of these conditions are true...

  • The Web Authorizer must use a static IP address.
  • The CyberAudit-Web server can only be reached with a domain name or it cannot be reached on the default https:// port 443.
  • A proxy server is required to reach the CyberAudit-Web server.
  • It is a Web Authorizer 2.

...then the Web Authorizer must be configured using a USB Flash Drive.

1 Edit the configuration settings for the Web Authorizer as needed. Save the settings. Then click on the "Generate USB Configuration Script" link.
generateUSB.png
2 Save the generated .tar.gz file onto a USB Flash Drive. The USB Flash drive must be formatted as FAT or FAT32. Before removing the USB Flash Drive from the computer, check the files to be sure that the latest .tar.gz file is on the stick without an appended version number. If not, delete all .tar.gz files from the USB Flash Drive and save the files again. Then remove the USB Flash Drive from the computer and take it to the Web Authorizer. Insert it into either USB port on the Web Authorizer.

(Note: The original model Web Authorizer was made with recessed USB ports; one of them covered. In cases where the USB Flash Drive does not directly fit into the recessed opening, use an extension as shown in the picture.


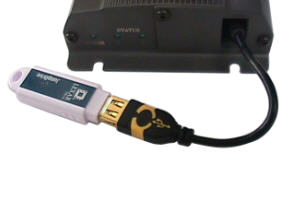
Original Model Web Authorizer with recessed USB ports
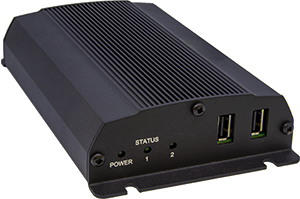
3 Original Model Web Authorizer - With the USB Flash Drive inserted, unplug the power cable from the Web Authorizer, wait 3 seconds, and re-insert it. After starting up, the Web Authorizer will update itself from the USB Flash Drive and load the new configuration. When this is happening, LEDs 1 and 2 flash in unison. When loading is completed, the flashing stops and the USB Flash Drive may be removed. When LED 1 flashes once every 4 seconds the Web Authorizer is back to normal operations.

Web Authorizer II - Insert the USB Flash Drive into the Web Authorizer while powered on, and the Web Authorizer will update itself from the USB Flash Drive and load the new configuration. When this is happening, LEDs 1 and 2 will flash off and on. When loading is completed, all three LEDs flash in succession indicating that diagnostic files are being written to the USB Flash Drive. After this is finished, the Web Authorizer will attempt to connect to its server. A solid Power LED indicates the Web Authorizer is connected to the server, while a steady blinking Power LED indicates the Web Authorizer is not connected to the server. At this point, the USB Flash Drive may be removed.

The only limit to the number of configurations that may be carried by a USB Flash Drive is the amount of memory on the Flash Drive. Generate Configuration File(s) creates configurations for all Web Authorizers in the system and loads them onto the drive.
img/products/AH-W1-2.jpg

Web Authorizer 2

Additional links:

Web Authorizer Description
Web Authorizer Details
Configuring a Web Authorizer
Resetting Web Authorizers
Web Authorizer Keyport Messages
Web Authorizer Special Code Inputs
Web Authorizer Caching
Web Authorizer Listing Page
Adding Web Authorizers
Installing a Keyport
Audit Trail Events
Web Authorizer Diagnostics
Other Communicators

Was this answer helpful?