Flex Assistant is a mobile application for Android designed to be a utility and troubleshooting tool for
Flex II system installations.
It is designed to be connected via USB to the Flex II controller and perform the following features:
- Review the current status and details of system.
- Simulate inputs, like a Request-to-Exit signal.
- View and manage events.
- Test the controller's network connection.
- Sync system clock to Android time.
- Upload current config file from server.
- Update firmware files from server.
- Enable debug logging.
- Fetch diagnostics log from the controller and send to the manufacturer for troubleshooting.
Relevant links:
- Flex System Concepts
- Programming the Flex II controller
- Flex II System Display Messages
- Flex II System Audit Trail Events
|
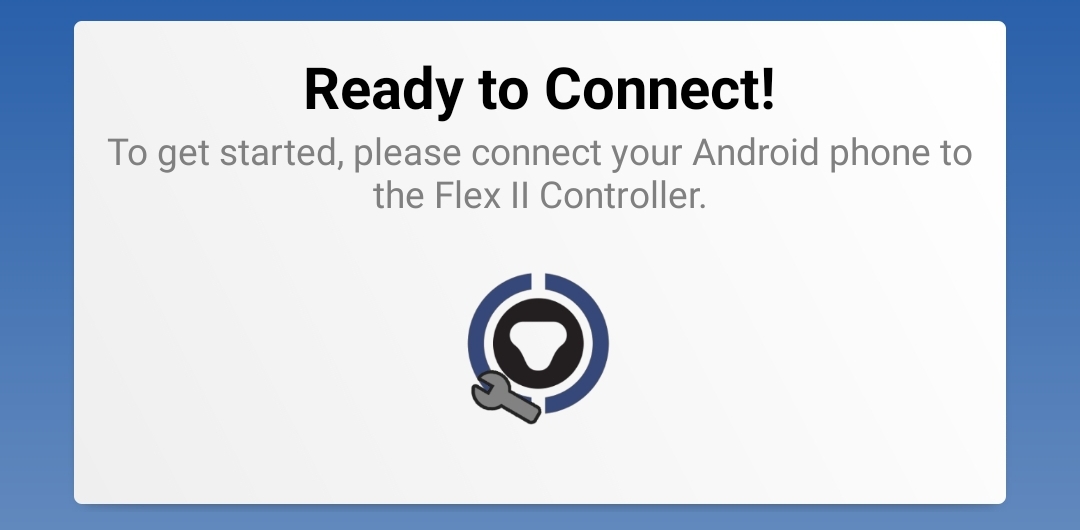
After installing the application, the user will be presented with the connect screen and instructions to connect your Android phone to the Flex II controller’s USB Type B port.
Note that you may need a Type C or micro-USB adapter to connect your phone. |
|
|
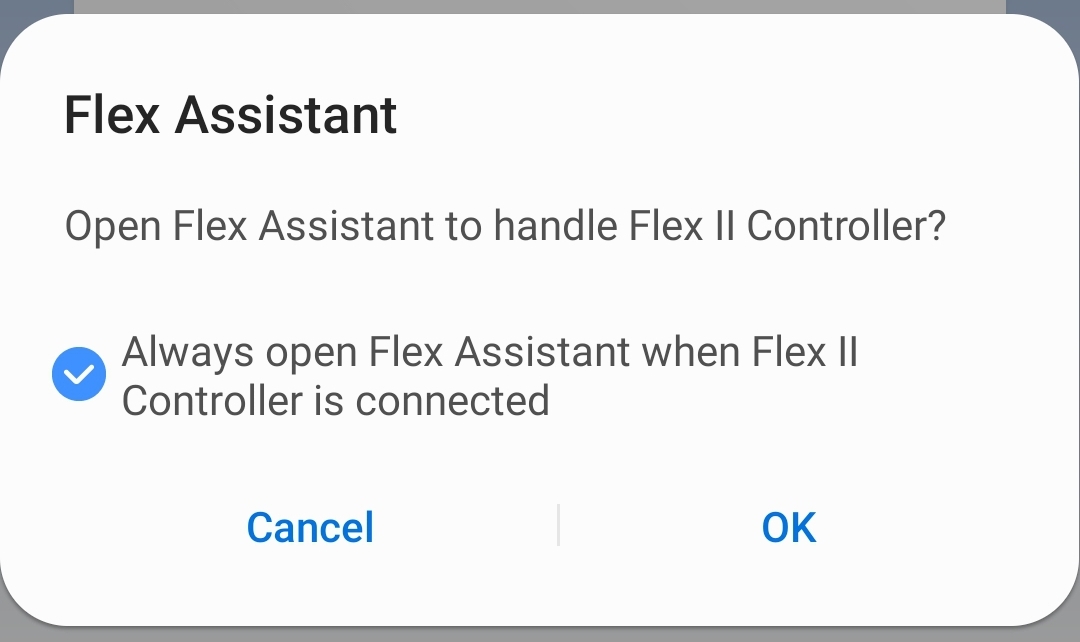
When you first connect your Flex II controller, a USB permissions dialog will appear on your screen.
This permission is required to communicate with the Flex II controller. By selecting the “Always open…” checkbox option, the permission will be automatically remembered in the future. |
|
|
At this point, most features in Flex Assistant will be available to use.
Certain configuration features, however, require Flex Assistant to be connected and authenticated to the CyberAudit-Web server. This includes downloading configuration and firmware files directly from the server and uploading them to the controller. Please review the Settings section below for more information. |
|
Communication occurs as follows:
|
There are three states of the Flex II controller relative to the CyberAudit-Web server:
|
| Dragging the page down will refresh the data displayed on the page. |
The System page contains system wide data and many issuable commands that can be sent to the controller. These commands test system health, manage configuration and firmware, and enable troubleshooting features.
|
Header:
The header displays the Flex Hub’s given name from CyberAudit-Web, along with additional tag information. Possible tags include:
|

|
|
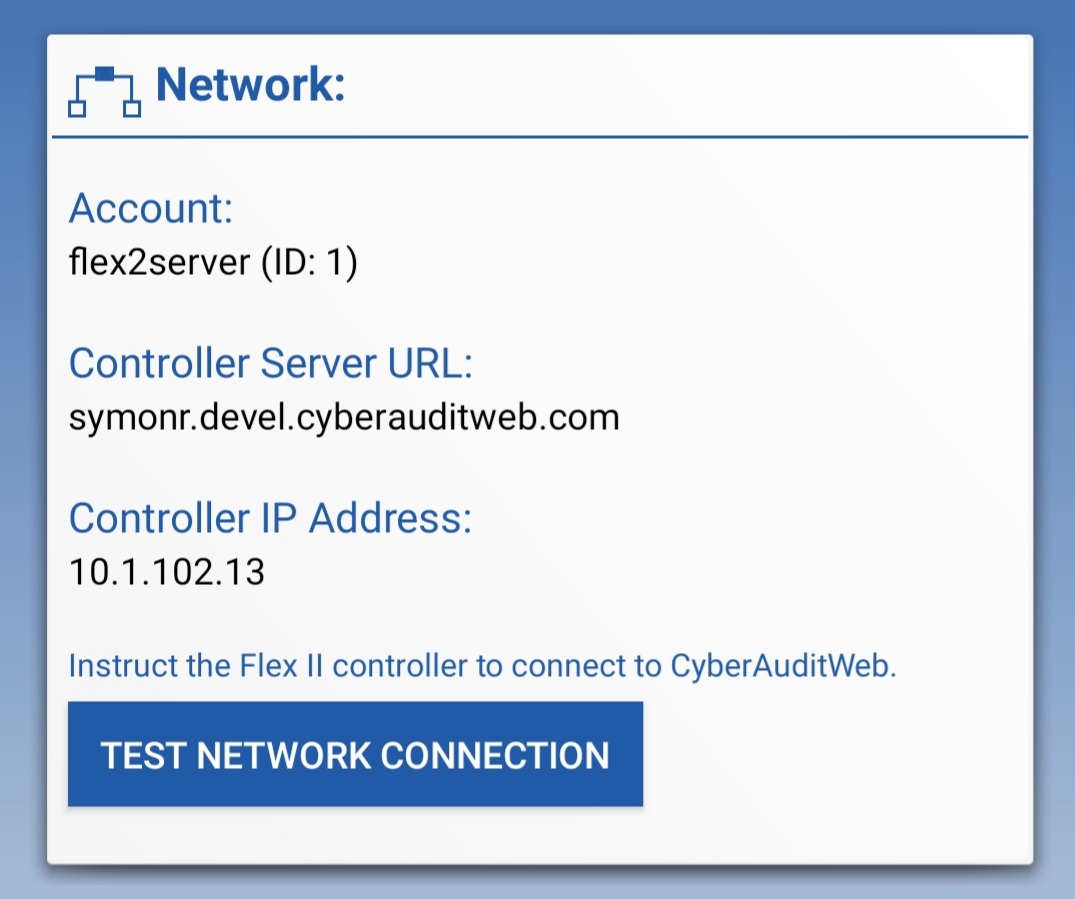
Network:
A common troubleshooting task for installation engineers is to properly set-up the controller’s connection to the CyberAudit-Web server. This section provides the action of issuing a “test network connection” command to the server, along with displaying relevant network data. When issuing the command, the controller will return a response value to indicate descriptive results. |
|
|
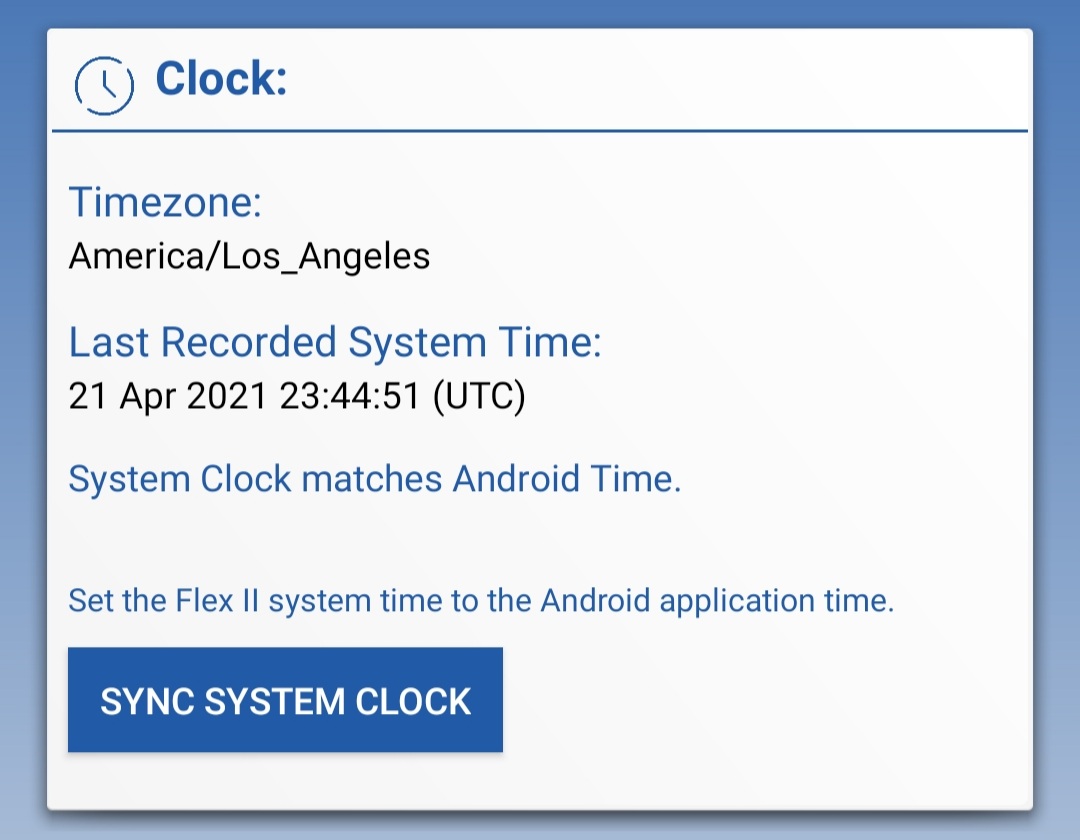
Clock:
When a power outage occurs, the system clock of the controller could potentially be affected. Using this action in this section will issue a command to sync the system clock with the Android’s current time with respect to time zone differences. |
|
|
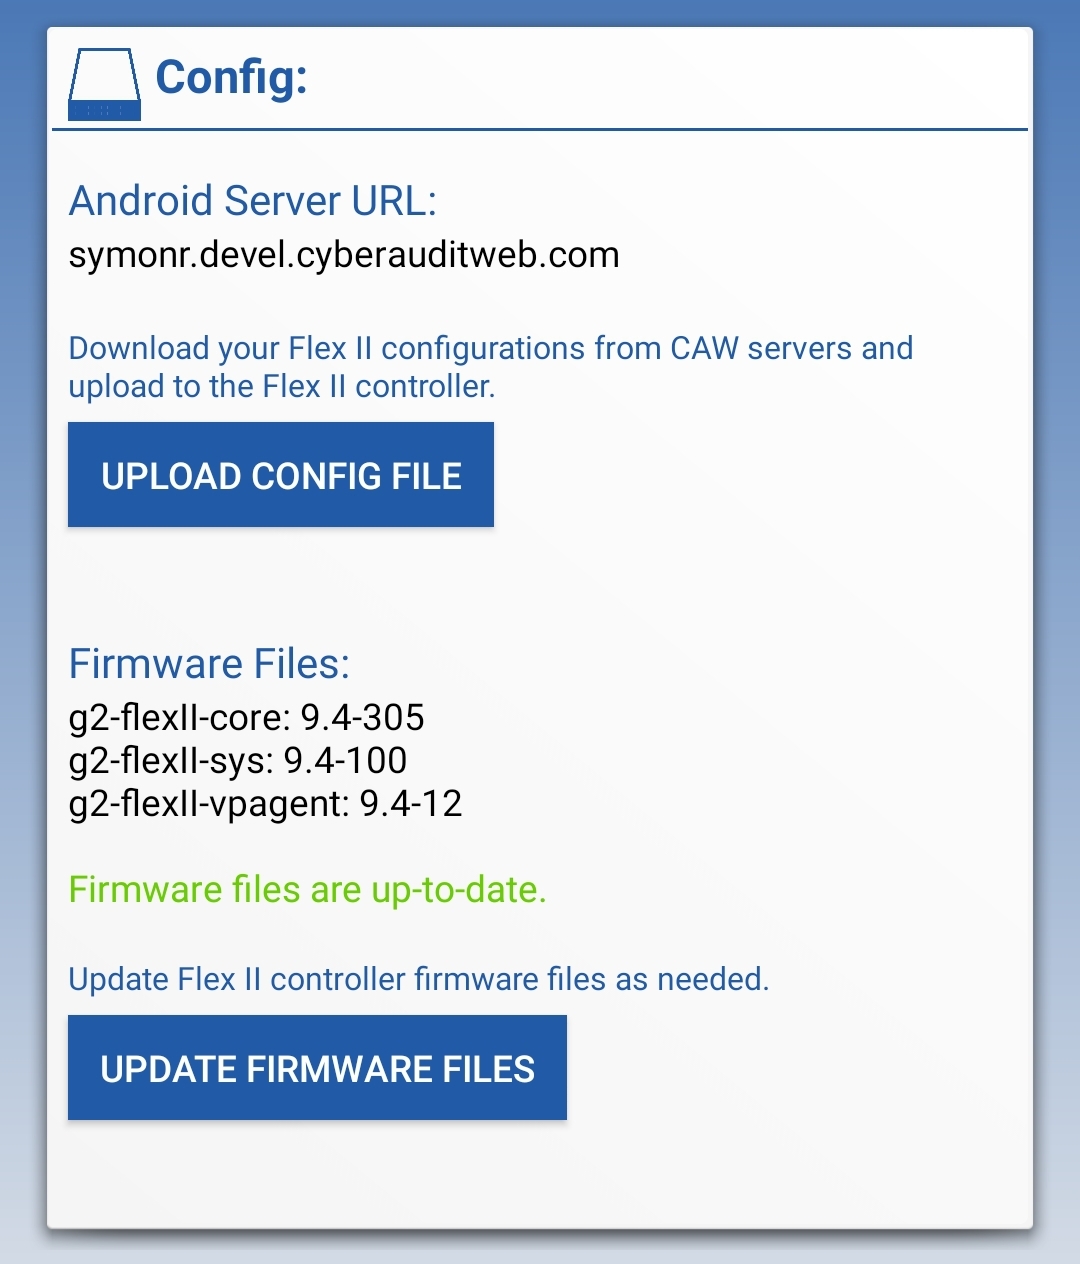
Config:
When correctly configured and connected with the server, the controller will automatically update its configuration and firmware. Flex Assistant is capable of manually updating configuration and firmware files, downloading them directly from the server and uploading to the controller. This process requires an authentication token, given by providing a portable link issue number from CyberAudit-Web. Please review the Settings section below for more information on how to set-up Flex Assistant’s connection to the CyberAudit-Web server. Upload Config File: Uploads the configuration file from the server to the controller. After successfully uploading the file, the controller will process the configuration and will send a “configuration applied” event afterwards. Update Firmware Files: Updates firmware files. Flex Assistant will display a firmware comparison message indicating if firmware files are up-to-date with the server or require an update. The “Check Firmware” action in the Settings page will refresh the expected firmware versions from the server. There are three firmware files for the Flex II controller:
|
|
|
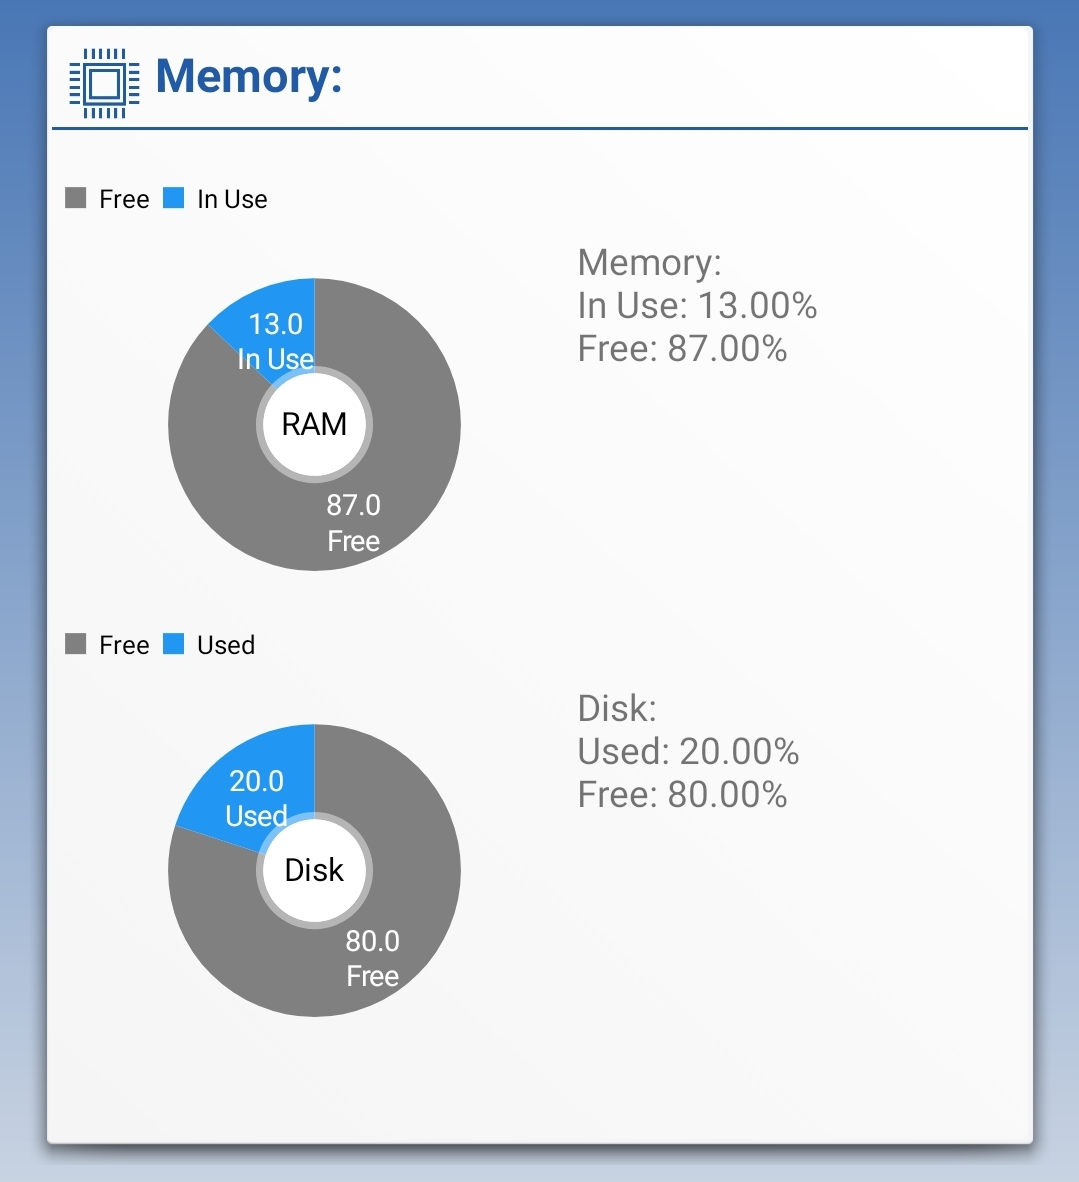
Memory:
This section displays memory usage statistics of the controller. Memory (RAM) and disk usage percentages are displayed here. |
|
|
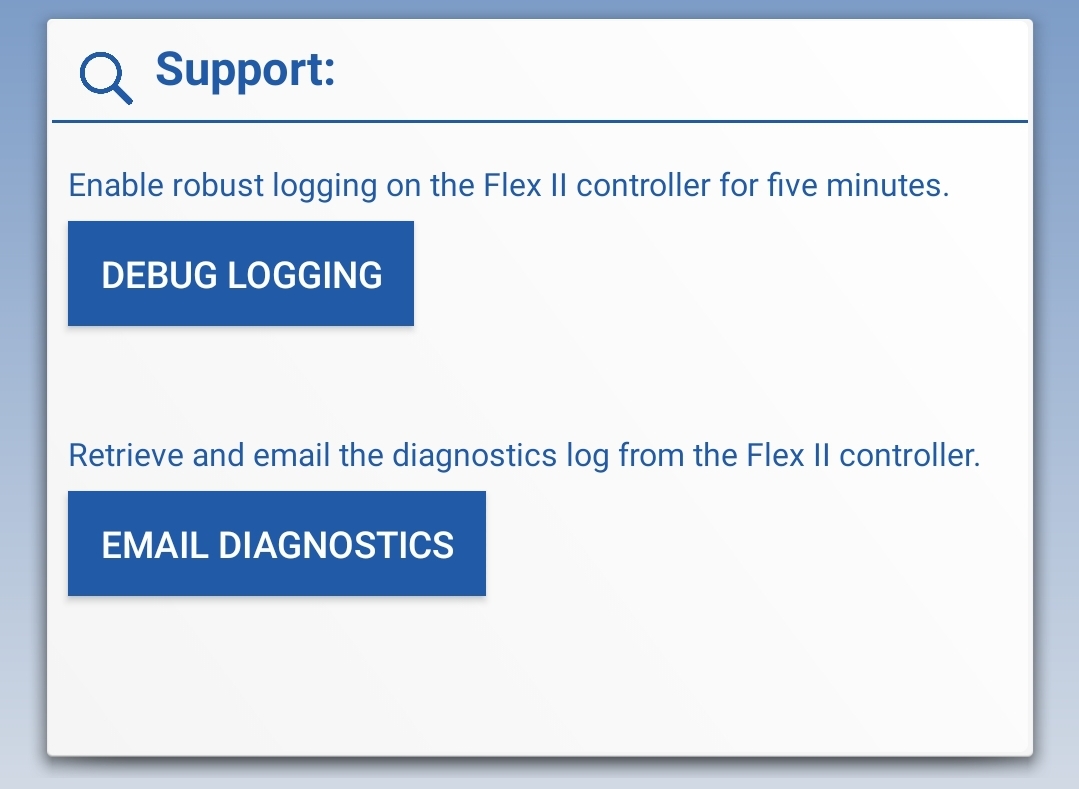
Support:
Additional troubleshooting steps can be performed here:
|
|
|
|
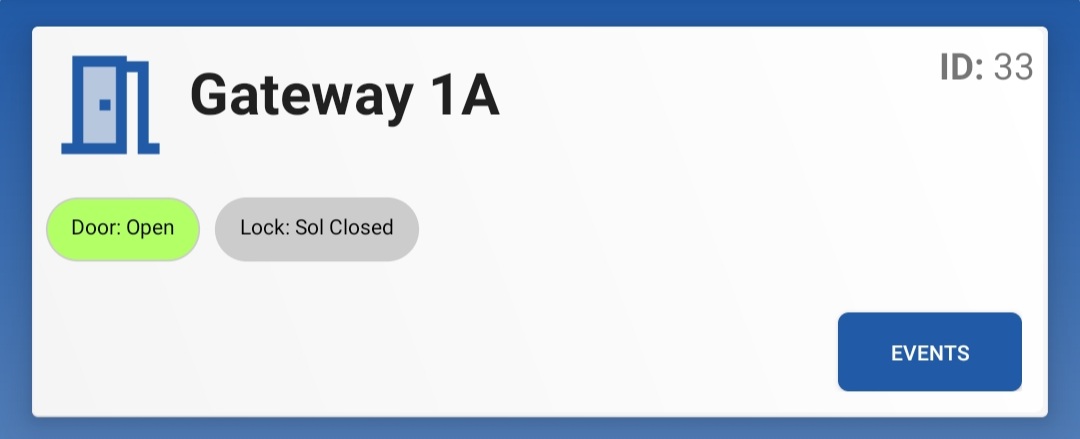
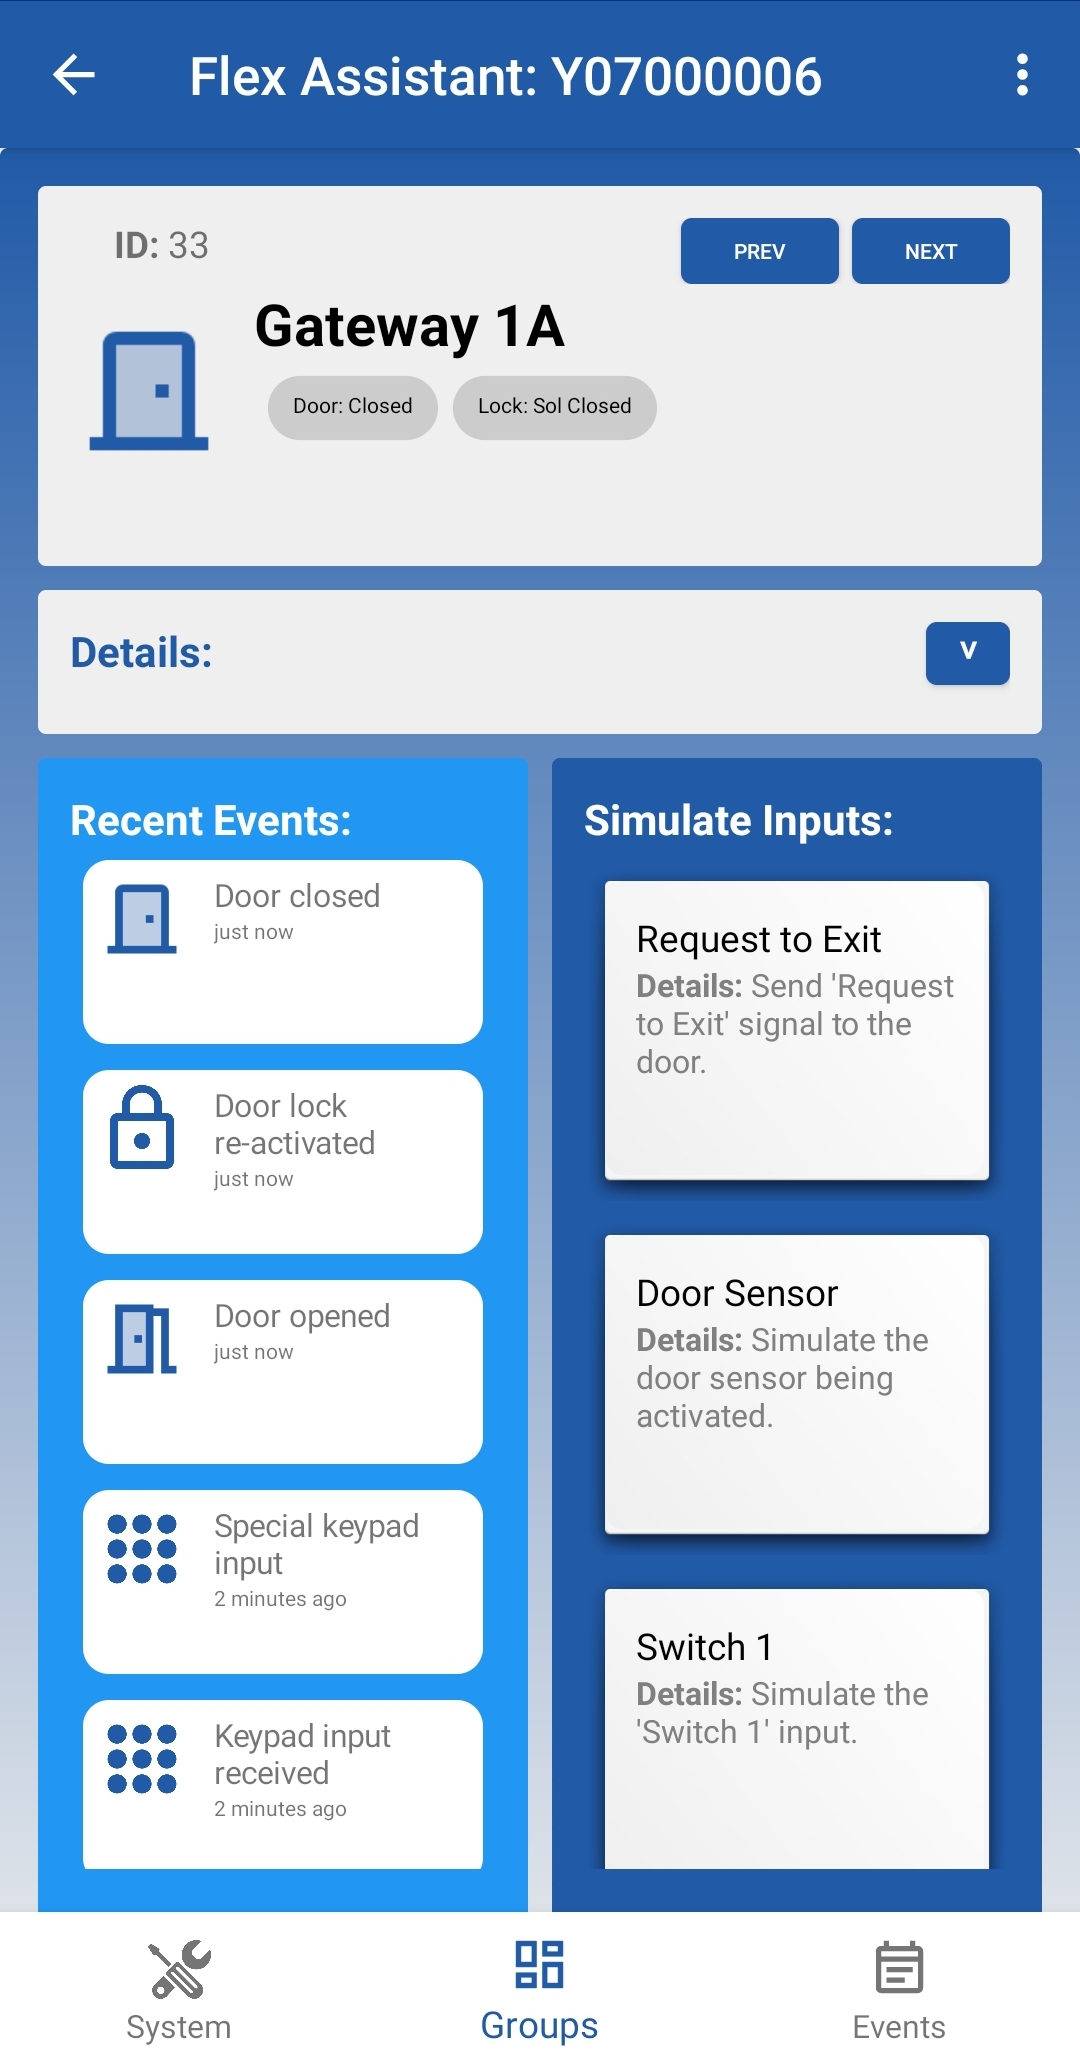
Displayed on the Groups Page are all door groups associated and configured with the controller. Status properties are included in the main page, such as Door Status or Lock Status.
Possible tags include:
- Door Status
- Lock Status
- Module Error(s)
- Troubled Module(s)
- Power Fail
- Hold Open
- Open Time
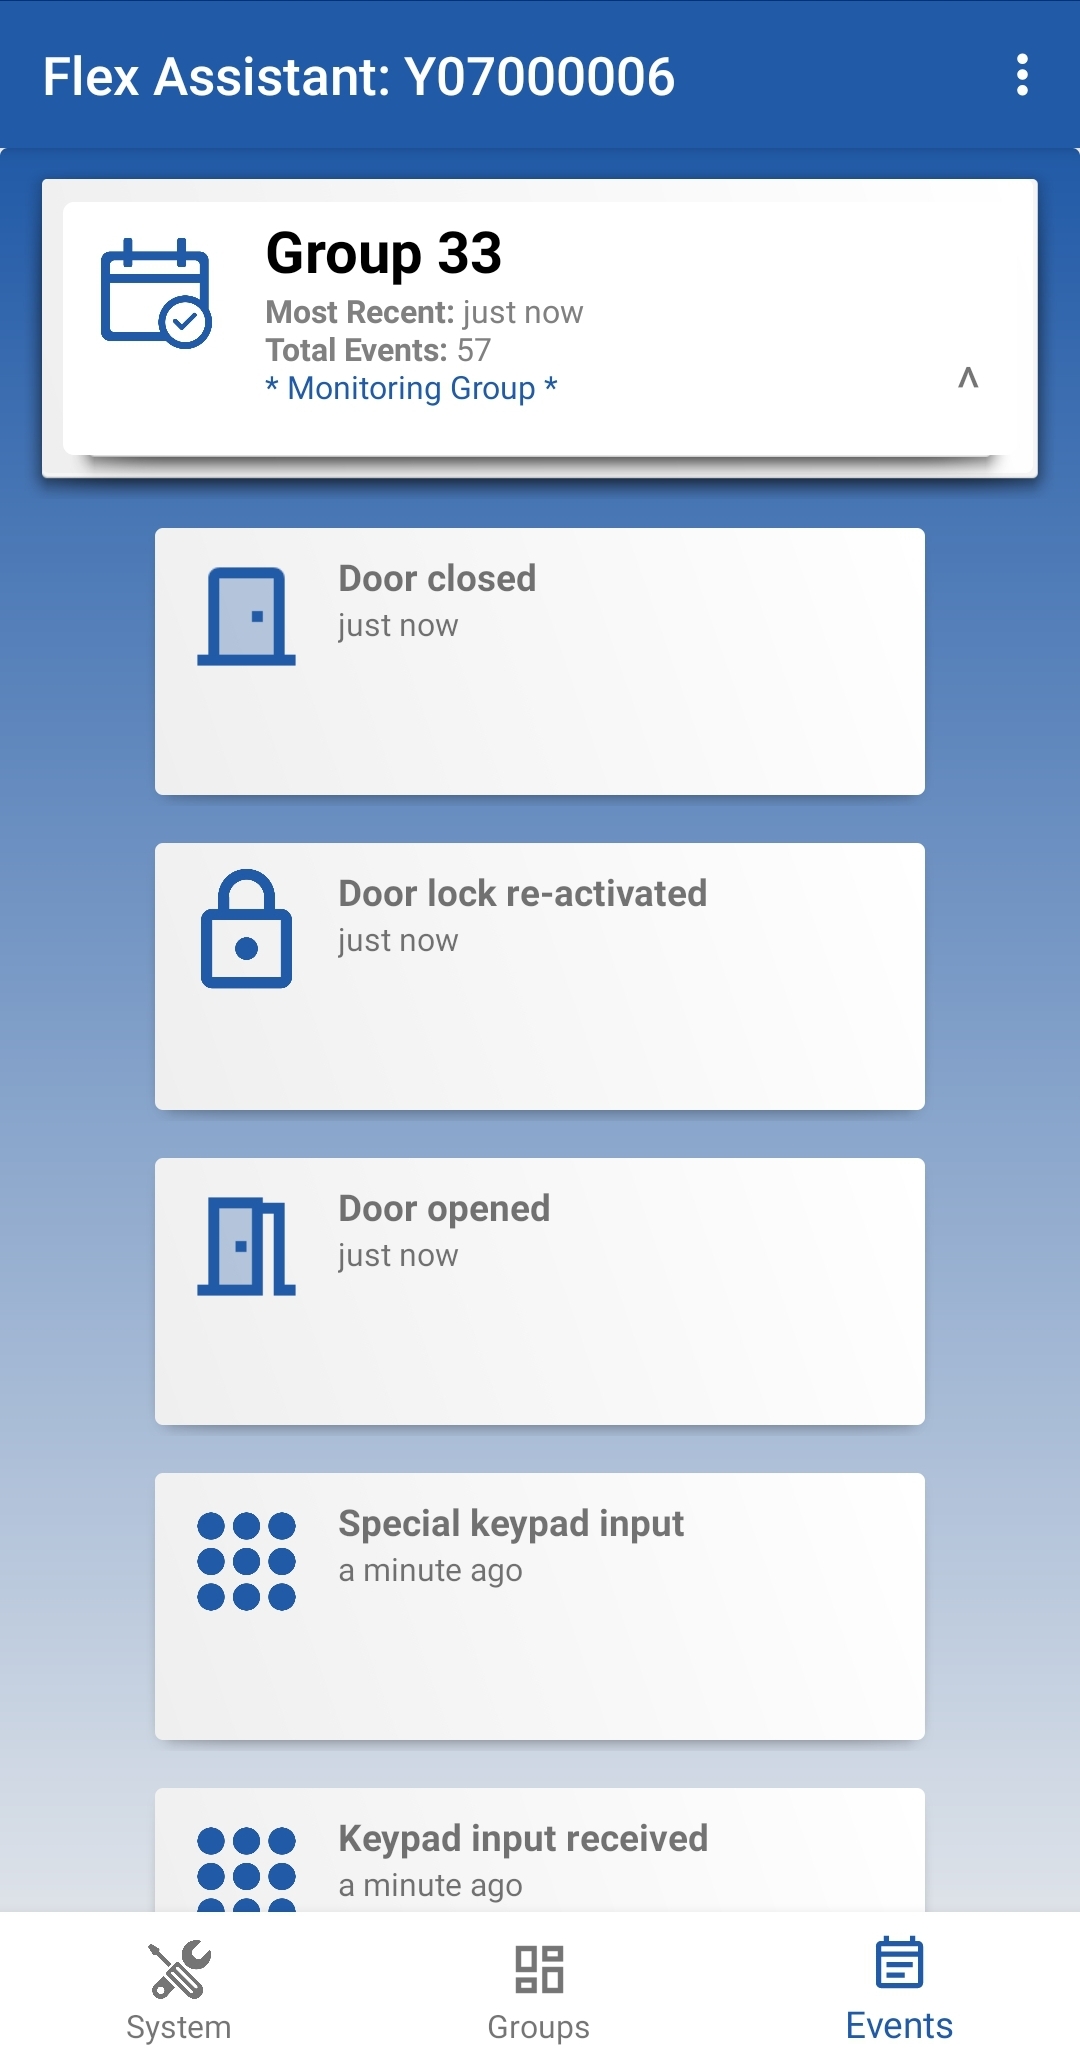
Tapping on a group will open up its single view page. Tapping the “View Events” button will open the group’s events on the Event page.
|
Single View:
Header: The header of the single view page displays the door’s name, its status information, and navigation options to go to other door groups. Details: Tapping the “V” button will expand the details section, which displays additional details about the door group in addition to all of its attached modules. Scrolling horizontally will display different attached modules. Modules: Each module card displays its serial, address, PID, and last contact time. Additionally, status tags can be found, which includes the following:
|
|
||
|
Tapping on an event card will reveal additional information. Tapping the “View All Events” card at the end of the sequence will navigate to the group’s events on the Events page.
When the user is on the single view page, new events will be automatically processed and cause the page to refresh when applicable. Simulate Inputs: Send “simulate input” commands to the controller. The controller will attempt to conduct these inputs. Note that some inputs will only work when corresponding modules are attached to the group. Actions include:
|
|||
When Flex Assistant is connected to the controller, events will be automatically sent to the app in real time. Events in the queue are processed every second in real time.
|
The Events page displays an event group card for every door group.
When selecting an event group, all events of that group are displayed. Additionally, the page will automatically refresh if new events are processed for the selected group. |
|
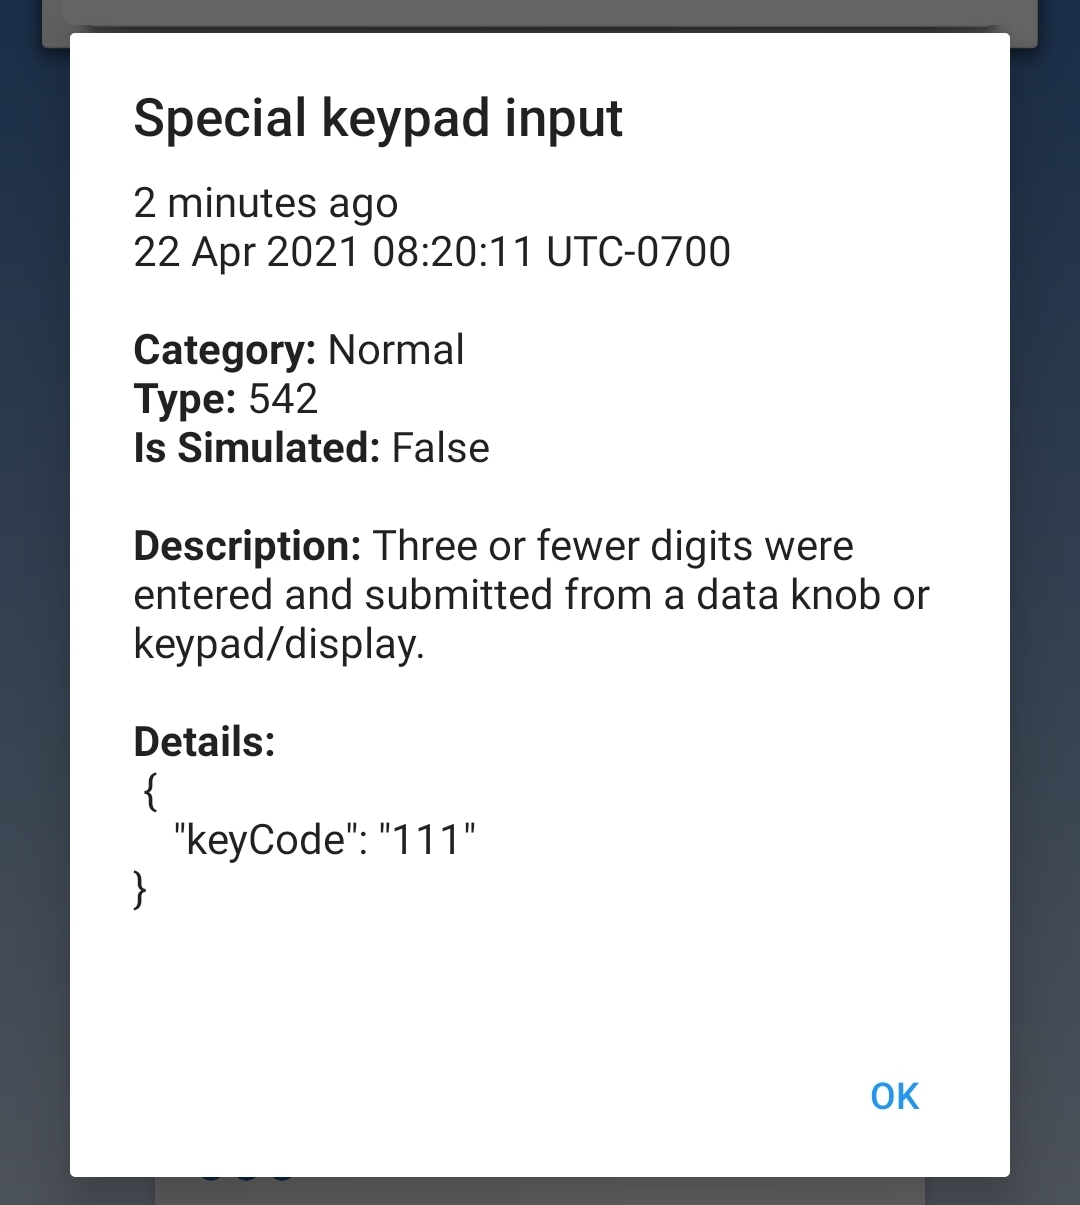
Selecting an event card will open a modal with additional information, including:
|
|
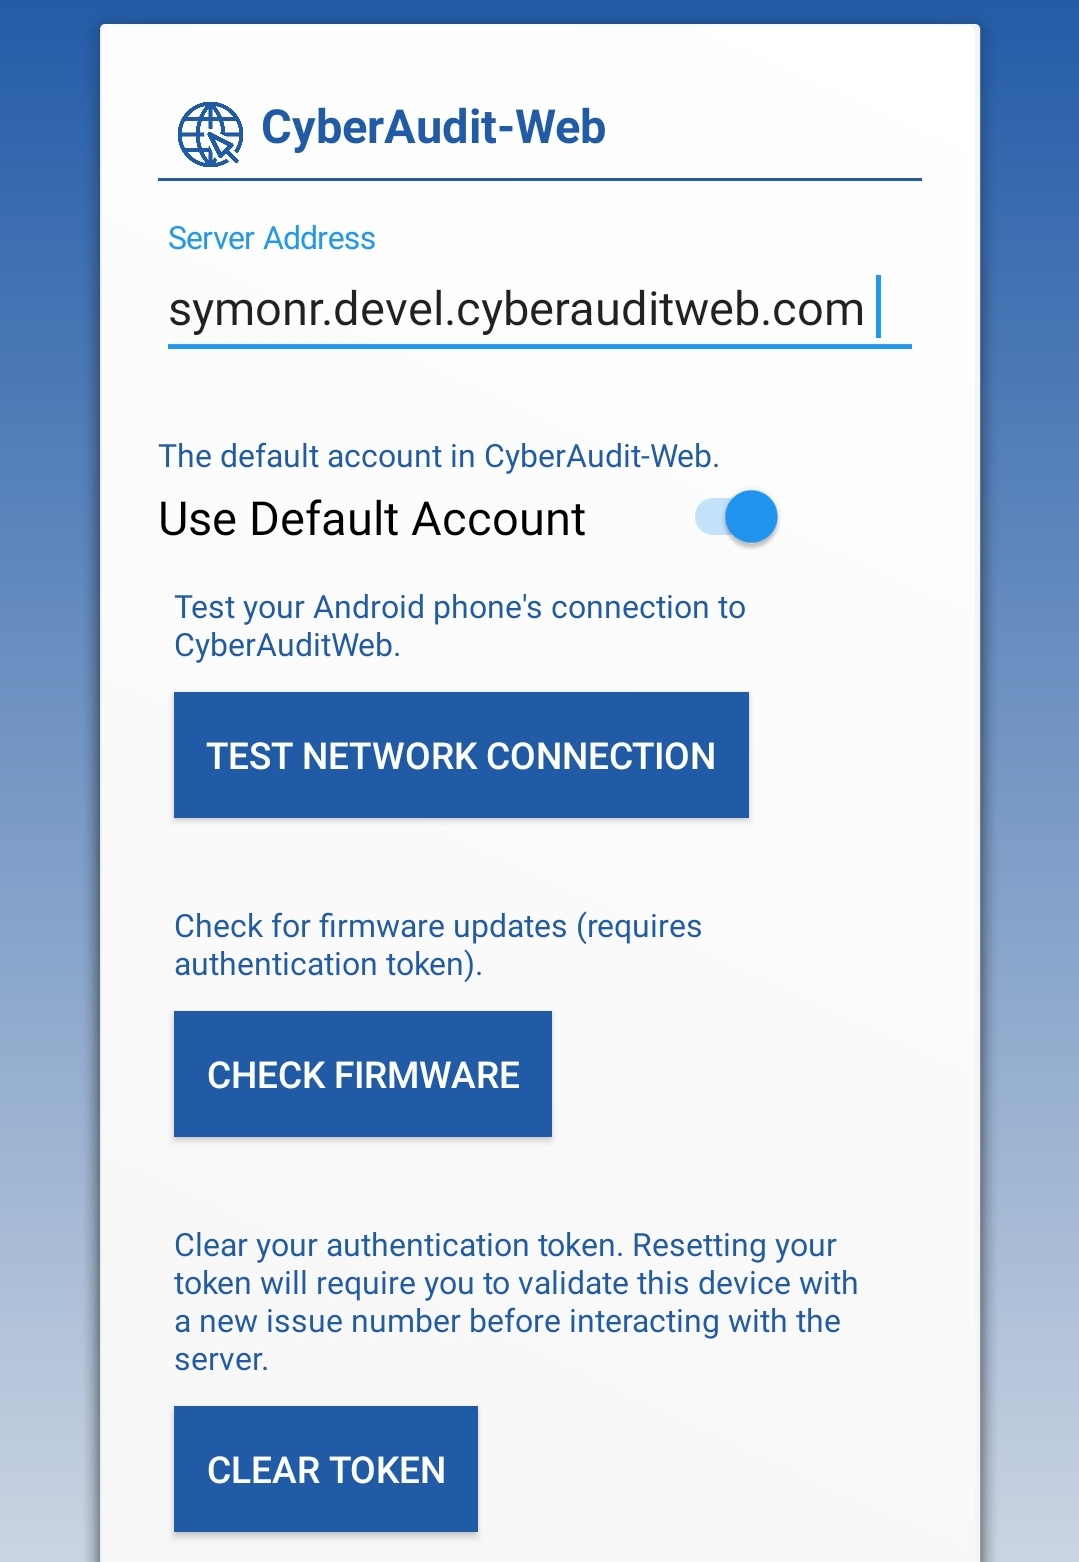
Settings are accessible by selecting the icon on the top-right of the app.
|
Refresh:
The refresh option will manually refresh the data displayed on the page. Alternatively, the app can be refreshed by pulling the page down and releasing. |
|
|
Technical Support Page:
The Technical Support page displays a log of the Flex Assistant’s current process. This will include error reporting and workflow troubleshooting logs specific to the mobile application. Additionally, the support log can also be sent as an email to the support team. Note that additional troubleshooting features specific to the Flex II controller are available on the System page. |
|
|
About Page:
Displayed here is the following information:
|
|
Events Section:
Clear All Events: This action will clear all cached events from Flex Assistant. Note that this doesn’t clear events recorded on the CyberAudit-Web server. |

|
|
CyberAudit-Web Section:
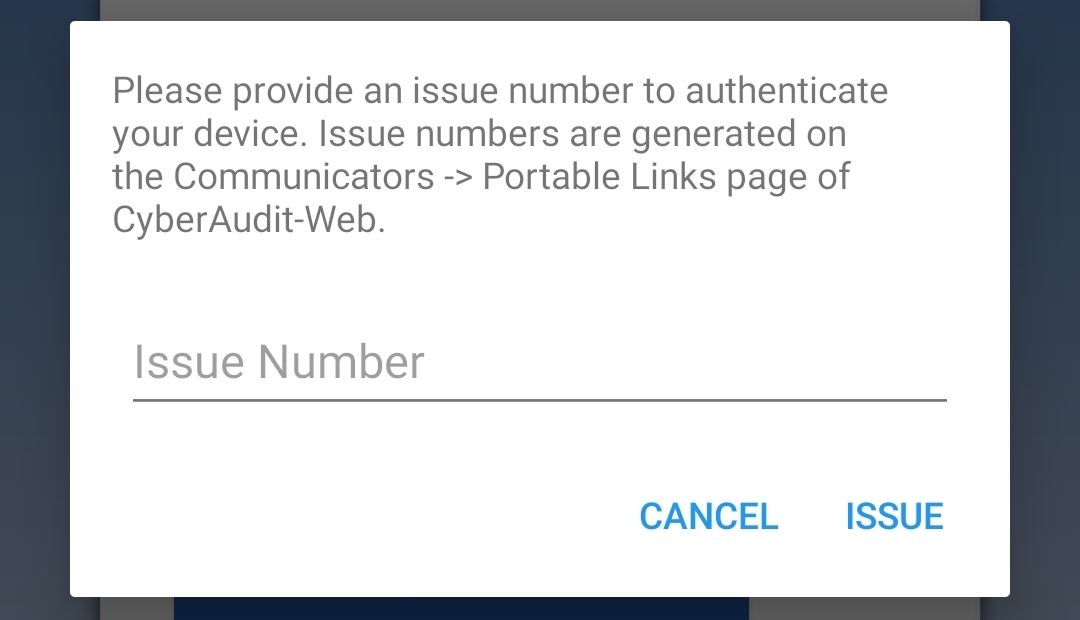
This section configures Flex Assistant to interact with the CyberAudit-Web server. Three things are required to successfully connect and authenticate with the server:
|
|
| Issue Number: After providing the server address and account name, tapping any CyberAudit-Web related action, such as “Test Network Connection” or “Check Firmware”, will prompt the user to enter an issue number if the mobile device has not been authenticated. Follow the prompts to authenticate with your server. |
|
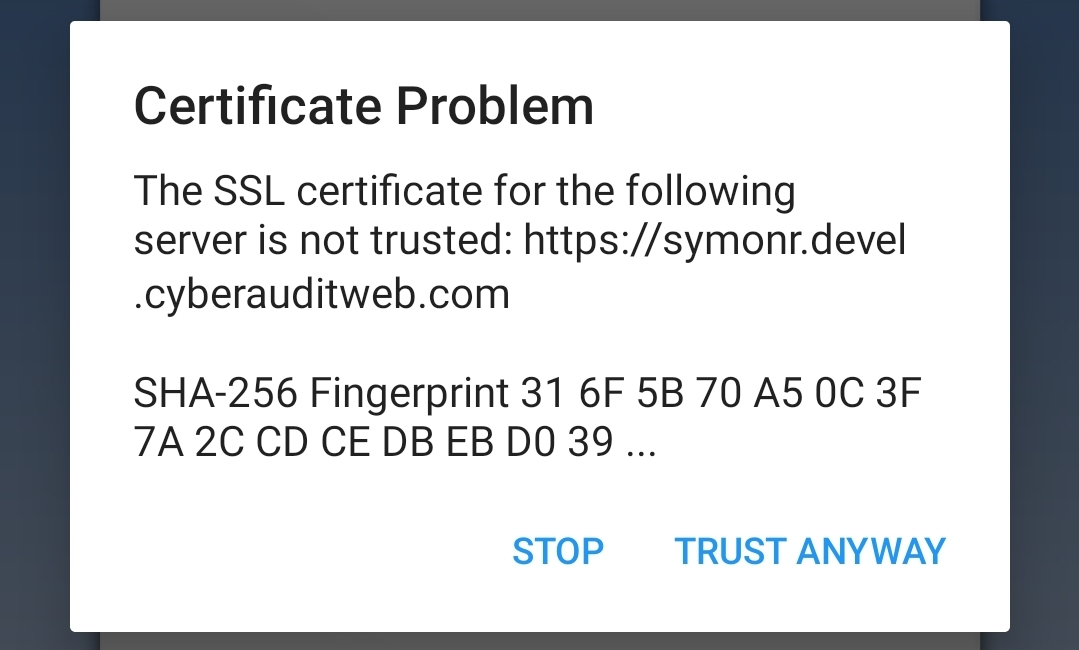
| If your server is configured with self-sign certificates, additional dialog will appear asking if you wish to trust the server. Tap “Trust Anyway”. |
|
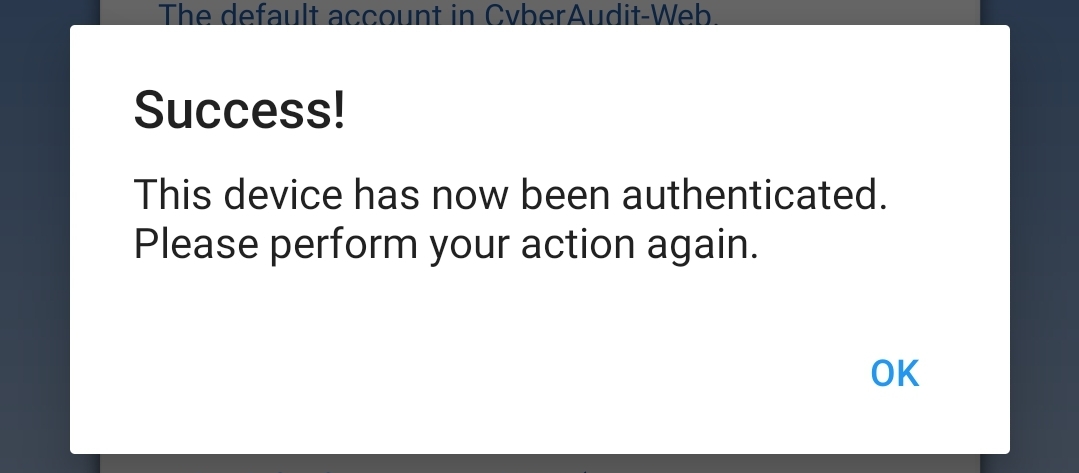
| After authenticating your mobile device, all CyberAudit-Web related actions will now be accessible. Available actions: |
|
|
|
