 Global Preferences
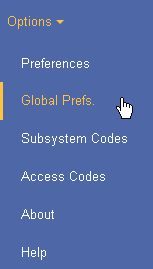
Global Preferences determine how the CyberAudit-Web Enterprise system will operate as a whole. The Global Preferences page is available to the head administrator by selecting Global Prefs from the Options menu.

|
The Global Preferences page is divided into several sections accessible by a selector. |

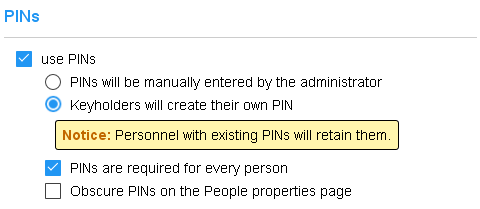 PINS are used as another layer of key security. When a user presents a key to a communicator, they may be prompted for a 4-8 digit PIN. Check the use PINs checkbox to enable PINs in the system. Then there are two modes for managing them:
|
|
 The Cyber Access app caches permissions to open CyberLock Blue CyberLocks. In this way, it behaves like a CyberKey which caches permissions to open CyberLocks and enables it to open locks when the mobile device cannot connect to the server. Expiring the Cyber Access cache serves the same purpose as configuring a rolling expiration rule for a CyberKey by adding a level of control to users who might choose to turn off networking on their devices. The Cyber Access app attempts to update from its account(s) every three hours or after it connects to a CyberLock Blue. At this time it uploads its audit trail events and updates its access permissions from the server. 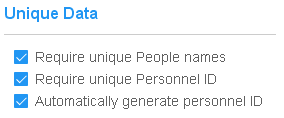 Unique People names within a system help ensure audit trail data clearly represents the person responsible for generating each audit trail event. When unique People names is not possible, a unique personnel ID can help reference the correct person through a report. CyberAudit-Web can, if desired, automatically generate a unique personnel ID for each new person added. Personnel ID may also be used as a cross reference to a centralized personnel management system. CyberAudit-Web People can be updated using the importing process or via a remote custom program using the CyberAudit-Web XML-RPC core web service SDK. |
|
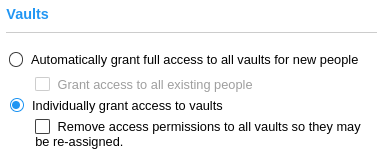
People must be granted permission to access vaults before they may use them to check out a CyberKey. The default on new systems is for all people to be automatically granted access to all vaults via the Full Access schedule when a person or a vault is added to the system. Existing systems may not have this option selected. Select between automatically granting full access or granting individual access. For each option, an additional checkbox will cause CyberAudit-Web to grant access to or remove access from all people when the administrator clicks Save. The action to revoke access also revokes access to people tags. The action to grant access grants full access to individual people, not people tags. |
|
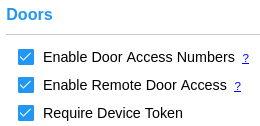
If the account is configured to use doors, checkboxes enable Door Access Numbers and Remote Door Access. Checking 'Require Device Token' helps ensure the link to open the door may only be used by one device. |
|
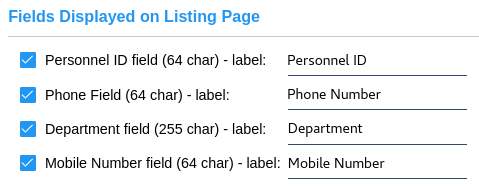
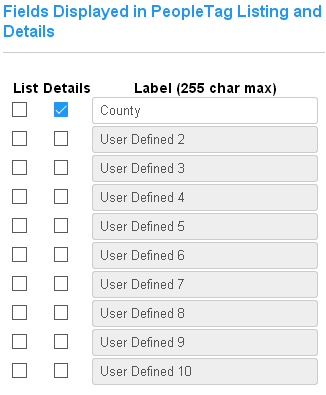
Enables optional details for people records and allows custom labels. These fields will be displayed in the people listing and details page. |
|
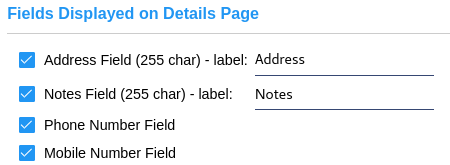
Enables additional optional details for people records and allows custom labels. These fields show in the details page only. |
|
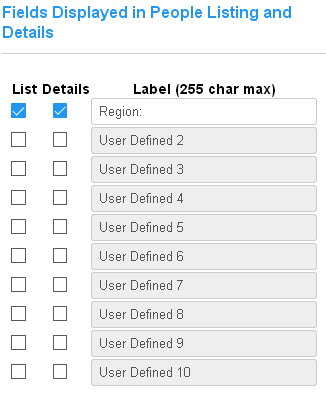
Enables additional user-defined fields for people and people tag records with custom labels. These fields hold string values by default. With the Dynamic Tags SEM, they may be enabled and defined with other data types and constraints. |


|
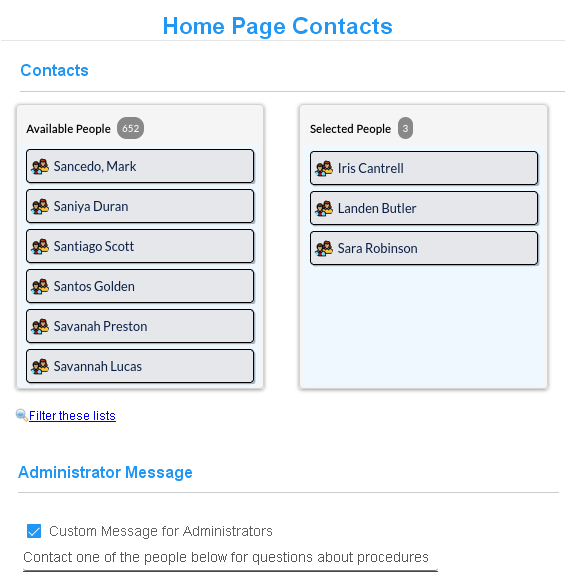
Contacts are people that appear in the
Home page and can help other
administrators with questions about
the use of the CyberAudit-Web system. Administrators of hosted systems may
add contacts from the system manage
section. To add contacts, use the
item chooser to select designated
contact people for the system. Only the contacts who are
visible to the administrator will
appear on the Home page.

A default message for contacts is shown above. A new message may be entered in this section. It may be up to 64 characters in length, including spaces. |
|
|
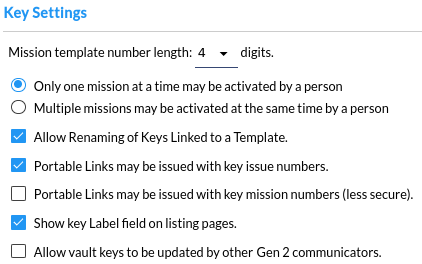
Enables setting the
mission mission template number length,
the rule for limiting mission concurrent active missions per person, and the rule for
automatically adding communicators.
|
People Preferences
Home Page Contacts>
CyberLock Preferences
Password Preferences
Login Options
Permissions Preferences
Enable Text Messaging
FlashLock and fob Preferences
RFID Card Preferences
Notebook Preferences
Active Directory/Azure AD Setup
Customizing the Home Page

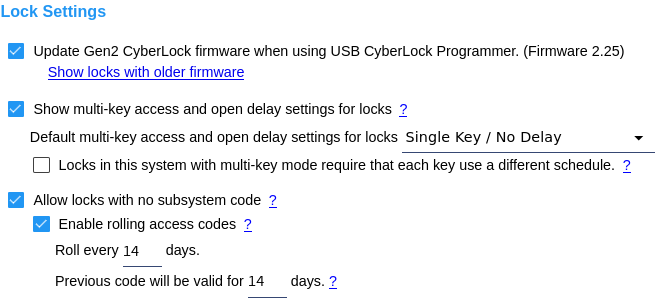
Update Gen2 CyberLock Firmware - This option toggles whether Gen2 CyberLocks in the system will get a firmware update when they are downloaded and updated using the CyberLock Programmer II. Normally this box would be kept checked unless the administrators want to postpont or don't wish to execute Gen2 lock firmware updates. Click the Show locks with older firmware link to generate a report of Gen2 locks which don't report having the current firmware. Multi-Key Access and Open Delay Settings - This option enables configuring multikey/delay settings for CyberLocks. The setting is in the Add New and Edit pages for locks and allows the administrator to change the multikey/delay settings for a CyberLock. The default setting will be used for any locks added by any administrator from the subsystem of their administrator node. Note: Multi-Key Access and Open Delay Settings are not supported by CyberLock Blue. Each key use a different schedule - The CyberLock may additionally require CyberKeys presented to the multi-key lock use a different schedule in their lock list than all the other keys participating in the attempt to open the lock. Allow locks with no subsystem code - With this option enabled, CyberLocks may be configured with no subsystem code. Enable rolling access codes - The option to use rolling access codes is enabled by a software enhancement module and must be enabled by the CyberAudit-Web hosting provider, if applicable. CyberLocks with no subsystem code may use rolling access codes for extra additional security. The settings include a frequency to roll the codes and grace period during which the previous access code will operate. Refer to the implications of using rolling access codes and associated articles before enabling these settings. |
|

|
|
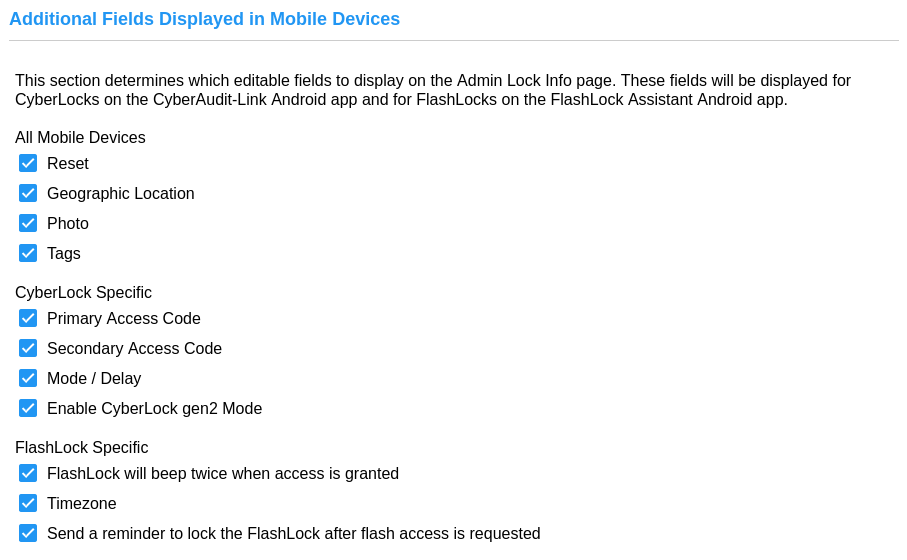
| Use this section to add and name up to ten 'user defined' fields. These fields may be viewable from the Locks and Lock Tag listing pages and/or the Lock and Lock Tag properties pages. They may be filtered from the Locks listing page, and may be included and sorted in reports. | |
Fields may also be selected for display in various mobile apps that support Admin authentication to
manage and update lock data. This includes features such as updating a lock's photo and capturing its
geolocation. The following apps support this feature:
|
|
|
|
People Preferences
Home Page Contacts>
CyberKey Preferences
CyberLock Preferences
Password Preferences
Login Options
Permissions Preferences
Enable Text Messaging
RFID Card Preferences
Notebook Preferences
Active Directory/Azure AD Setup
Customizing the Home Page

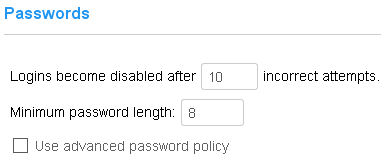 Passwords are used by administrators to log in to CyberAudit-Web. There are two basic password policies enforced in all CyberAudit-Web systems: Number of failed attempts - If an identified CyberAudit-Web administrator fails to enter their correct password, CyberAudit-Web begins a count of incorrect attempts. When the count exceeds the maximum, specified on this page, the login is automatically disabled. In addition, failed attempts are throttled by imposing a delay after incorrectly entering the password for a login. The throttling behavior is as follows:
CyberAudit-Web sets a default value of 10 failed attempts. Minimum Password Length - CyberAudit-Web sets a default value of 8 for this field. In general, recent NIST recommendations advise that longer passwords are harder to guess and therefore more secure. Advanced Password Policies - Advanced password policies are also available. However as of 2016 NIST does not recommend such policies because they tend to cause people to create predictable passwords or write them down on paper. |
|||||||||
People Preferences
Home Page Contacts>
CyberKey Preferences
CyberLock Preferences
Login Options
Permissions Preferences
Enable Text Messaging
FlashLock and fob Preferences
RFID Card Preferences
Notebook Preferences
Active Directory/Azure AD Setup
Customizing the Home Page
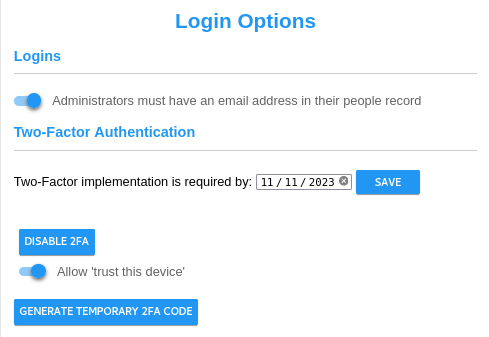
CyberAudit-Web administrators can receive an email to reset their password in the event they forget it. An email address must be entered in their people record. To help enforce this, a toggle is available to notify about administrators who don't have an email address entered and to enforce entering one when editing their people record. Two-factor authentication is an optional feature for CyberAudit-Web available with the Advanced Security Features software enhancement module and must be enabled for the account in the manage section.. It adds extra security to the server by requiring administrators to enter a 6 digit Time-based One-time Password (TOTP) in addition to their login and password. Allow 'trust this device' - Enabling this slider presents a 'Trust this device' checkbox to the administrator on the page they enter their 6 digit TOTP. This causes CyberAudit-Web to send information to the brower to save and use in lieu of the TOTP the next time the administrator logs in. Enable 2FA - This button (which is replaced by " Disable 2FA " when Two-Factor Authentication is enabled for the user), will take the user to the introductory page for 2FA implementation. Disabling 2FA disables for all administrators in the account. Generate Temporary code - This button is also only available after 2FA has been enabled by the current administrator. Clicking this button will take the user to tbe 'generate temporary code' page where they can create a one-time-use temporary code for lower-level logins who are not able to access their account. |

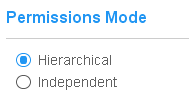
The Permission Mode setting determines how permissions can be propagated to administrator nodes. Hierarchical Mode requires that in order to have a permission, the administrator node's immediate superior must have the permission. Independent Mode does not have this restriction. |
People Preferences
Home Page Contacts>
CyberKey Preferences
CyberLock Preferences
Password Preferences
Login Options
Enable Text Messaging
FlashLock and fob Preferences
RFID Card Preferences
Notebook Preferences
Active Directory/Azure AD Setup
Customizing the Home Page

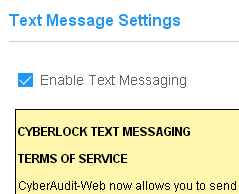
If the CyberAudit-Web system is connected to a text message service, and made available to the account in the CyberAudit-Web manage section, it may be enabled. An administrator must agree to the CyberLock Text Messaging Terms of Service before the service will become available. |
People Preferences
Home Page Contacts>
CyberKey Preferences
CyberLock Preferences
Password Preferences
Login Options
Permissions Preferences
FlashLock and fob Preferences
RFID Card Preferences
Notebook Preferences
Active Directory/Azure AD Setup
Customizing the Home Page

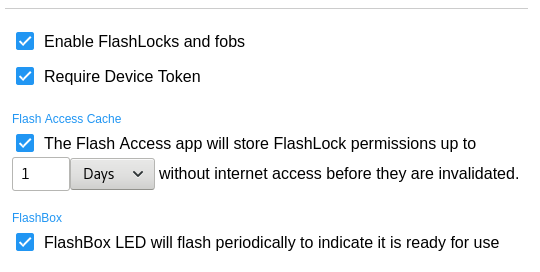
If the CyberAudit-Web system has the FlashLocks SEM, and FlashLocks are made available to the account, in the CyberAudit-Web manage section, they may be enabled on this page. An administrator must agree to the FlashLock Software Enhancement Module Terms of Service before FlashLocks and fobs will become available. Require Device Token - Flash Access is sent to a user in an email or text message. Requiring a device token ensures that only one specific device may be used by a person to open any FlashLock. The browser or Flash Access app will ask the user if this is the device they intend to use. If this box is checked, they must answer 'yes' to this question or the server will not send a flash code to the device. After they answer 'yes', any other device will be rejected by the server. If the user wants to use a different device, the administrator may clear the token. Flash Access Cache - The app can store permissions to open FlashLocks for a period of time up to 14 days. This may be useful in the event the CyberAudit-Web server is not accessible for any reason. To allow caching FlashLock permissions on a mobile device, check the box and determine the maximum amount of time to allow storing the permissions. The Flash Access app will attempt to connect to its CyberAudit-Web server whenever the app is active to verify the cached access permissions are still valid. FlashBox - A FlashBox flashes its LEDs once every eight seconds. This 'heartbeat' is an indicator that the FlashBox is functioning and its battery is OK. Uncheck the box to disable this heartbeat. |
People Preferences
Home Page Contacts>
CyberKey Preferences
CyberLock Preferences
Password Preferences
Login Options
Permissions Preferences
Enable Text Messaging
RFID Card Preferences
Notebook Preferences
Active Directory/Azure AD Setup
Customizing the Home Page
